Choose a Setting Type
Pick one of the five Gears setting types, see what each looks like in the game, and find the XML that declares it and the C# interface that reads it.
Gears offers five setting types. Use this page to pick the right one, then copy the XML that declares it and the C# interface that reads it.
The ModSettings.xml Reference lists the rules for every attribute. Use Global Settings in C# covers the C# side in full.
How settings are organized
A mod's settings fall into two groups. A global setting belongs to the player and applies in every world. A world setting belongs to one world, is chosen by the host, and is sent to every client that joins. Choose Global or World Settings covers how to pick between them.
- TabA button across the top of the page
- CategoryA heading that groups settings
- SettingA control the player changes
- CategoryA heading that groups settings
- SettingA control the player changes
Tabs appear as a row of buttons across the top of the mod's settings page. A category is a heading within a tab, and the settings sit under it. World settings have no tabs.

A tab carries only a label and an optional hover tooltip, set with tooltipKey. A category does
more: it can carry a caption, a description and a preview image, which appear in the description
pane when the player hovers over it.
Pick a type
| You want the player to… | Use | Value types | Global | World |
|---|---|---|---|---|
| pick one option from a fixed list | Selector | int, float, string, enum | yes | yes |
| pick a number within a range | Slider | int, float | yes | yes |
| turn something on or off, or choose between two things | Switch | bool, string, enum | yes | yes |
| pick a color | Color | color | yes | no |
| rebind a key | Binding | none | yes | no |
Every Selector, Slider and Switch must declare a type and a defaultValue, and every Color a
defaultValue. Gears drops a setting that is missing one, and writes a line to the log. Nothing
appears in the menu.
Selector

A Selector shows one value at a time, with arrows on either side to step through the allowed values. Use it when the options form a fixed and fairly short list: quality levels, a day of the week, a difficulty preset, a handful of numbers.
Set the allowed values in one of three ways:
- List them in
<List allowedValues="…"/>, separated by commas. - Give an
<Incremental increment minValue maxValue/>range, which Gears expands to every step.intandfloatonly. - Name an enum as the
type. Gears uses the enum's own members, in declaration order, and you write nothing else. Write the enum's full name, such asMyMod.Difficulty, or add the assembly name, such asMyMod.Difficulty, MyMod. See Use Custom Value Types.
Gears shows each value through the optional <Formatter ui="…"/> and <LocalizationPrefix/>, so a
string selector can display translated labels for its raw values. Add <Wrap wrap="true"/> to let
the last value step round to the first.
<Selector name="Units" displayKey="myModUnits" type="string" defaultValue="metric">
	<List allowedValues="metric,imperial" />
	<LocalizationPrefix prefix="myModUnits_" />
	<Description key="myModUnitsDesc" />
</Selector>

<Selector name="Quality" displayKey="myModQuality" type="int" defaultValue="2">
	<Incremental increment="1" minValue="0" maxValue="4" />
	<Wrap wrap="true" />
	<Preview>
		<Image value="0" path="@modfolder(MyMod)://Textures/quality0.png" />
		<Image value="4" path="@modfolder(MyMod)://Textures/quality4.png" />
	</Preview>
</Selector>

<!-- MyMod.Difficulty is an enum your own mod declares. -->
<Selector name="Mode" displayKey="myModMode" type="MyMod.Difficulty" defaultValue="Normal" />
The second example attaches a preview image to two of its values. The pane beside the setting shows
the image for whichever value is selected. @modfolder(MyMod): is the game's prefix for a path
inside a mod's folder. Replace MyMod with the <Name> from your ModInfo.xml.
In C# a Selector is an ISelectorGlobalSetting<T>
or an ISelectorWorldSetting<T>. The C# examples
on this page assume the settings sit in a Display category of a General tab, and look that
category up first:
// modSettings is the IModGlobalSettings that OnGlobalSettingsLoaded receives.
IGlobalModSettingsCategory category = modSettings.GetTab("General")?.GetCategory("Display");

ISelectorGlobalSetting<string> units = category.GetSetting<ISelectorGlobalSetting<string>>("Units");
string current = units.SettingValue;           // "metric" or "imperial"
string[] all = units.GetAllowedValues();       // { "metric", "imperial" }
Slider

A Slider is a bar the player drags, with arrows that nudge it one step. The current value is drawn over the bar. Use it for a number with many possible values, where the exact figure matters less than roughly where it sits: a volume, a scale, a multiplier, a field of view.
Sliders take int or float only, and <Incremental/> sets the range. A float slider
understands percent notation, so a range written as 50% to 150% is stored as 0.5 to 1.5, and
<Formatter ui="0%"/> shows it as a percentage again. The serialize attribute controls how the
number is written to disk and what modsetting() returns.
<Slider name="HudScale" displayKey="myModHudScale" type="float" defaultValue="100%">
	<Incremental increment="5%" minValue="50%" maxValue="150%" />
	<Formatter ui="0%" serialize="0.00" />
	<Description key="myModHudScaleDesc" />
	<RestartScope scope="Reload" />
</Slider>

<Slider name="Fov" displayKey="myModFov" type="int" defaultValue="65">
	<Incremental increment="5" minValue="45" maxValue="120" />
</Slider>
The first example also declares a <RestartScope/>, which shows the player a reminder that the
change needs the world reloaded.
In C#:
ISliderGlobalSetting<float> hudScale = category.GetSetting<ISliderGlobalSetting<float>>("HudScale");
float scale = hudScale.SettingValue;           // 1.0f for "100%"
float step = hudScale.Increment;               // 0.05f
Switch

A Switch is two buttons side by side, and the lit one is the current value. Use it to turn something on or off, or for any either-or choice: metric or imperial, left or right, easy or hard.
The type decides the two sides:
- A
boolswitch isfalseon the left andtrueon the right, with nothing more to write. - A
stringswitch names its sides with<Buttons left="…" right="…"/>. - An enum switch takes the first two members of the enum, or the two you name in
<Buttons/>.
The button labels are the raw values unless a <LocalizationPrefix/> turns them into localization
keys. That is how a bool switch reads "Off" and "On" instead of "False" and "True".
<Switch name="ShowHints" displayKey="myModShowHints" type="bool" defaultValue="true">
	<LocalizationPrefix prefix="myModOnOff_" />   <!-- keys myModOnOff_False and myModOnOff_True -->
	<Description key="myModShowHintsDesc" />
</Switch>

<Switch name="Units" displayKey="myModUnits" type="string" defaultValue="metric">
	<Buttons left="metric" right="imperial" />
</Switch>

<!-- MyMod.Difficulty is an enum your own mod declares. -->
<Switch name="Difficulty" displayKey="myModDifficulty" type="MyMod.Difficulty" defaultValue="Easy">
	<Buttons left="Easy" right="Hard" />
</Switch>
In C#:
ISwitchGlobalSetting<bool> hints = category.GetSetting<ISwitchGlobalSetting<bool>>("ShowHints");
bool show = hints.SettingValue;
Color
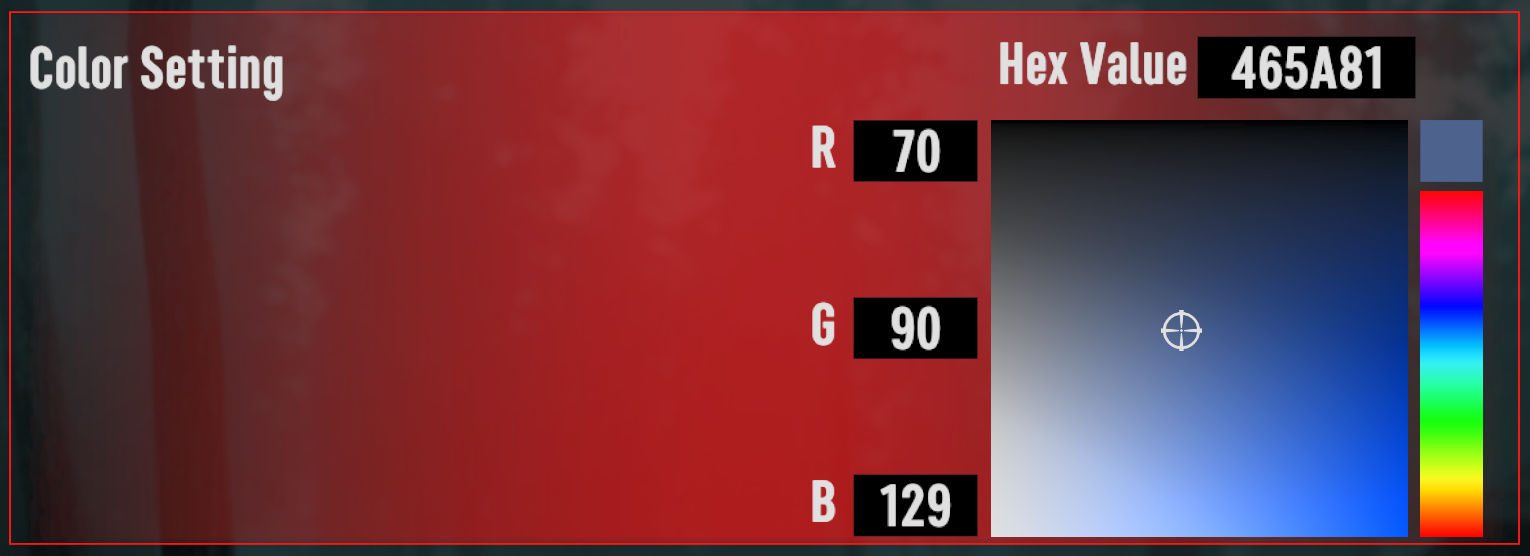
A Color setting opens the game's own color picker and shows the chosen color as a swatch. Use it for
anything the player might want to tint: heads-up display (HUD) text, a marker, an outline. Its type
is fixed, so it needs no type attribute, and its defaultValue is red, green and blue in the
range 0 to 255.
A Color setting is global only, and it takes a single preview image. A picker cannot show one
image per color, so Gears ignores <Image value="…"/> and logs a warning.
<Color name="Accent" displayKey="myModAccent" defaultValue="255,128,0">
	<Description key="myModAccentDesc" />
</Color>
In C# a Color is an IColorSelectorGlobalSetting,
which holds a UnityEngine.Color:
IColorSelectorGlobalSetting accent = category.GetSetting<IColorSelectorGlobalSetting>("Accent");
Color tint = accent.SettingValue;
In an XML patch, modsetting() returns the color as R,G,B, which the game's user interface color
attributes accept directly.
Binding

A Binding is a row in the mod's settings page where the player rebinds one of your mod's controls,
using the same control the game's own Controls screen uses. The cross clears the binding. A Binding
holds no value of its own: the key lives with the game's PlayerAction behind it.
A Binding is the one setting type that needs C#. The XML only creates the row. Until your code
assigns the PlayerAction, the row reads - Missing PlayerAction -, as in the screenshot
above.
A Binding is global only, takes no type and no defaultValue, and is not written to the saved
settings file. The binding is stored wherever your PlayerAction set stores it.
This Binding sits in a Vehicle category of a Controls tab, so its path is
Controls.Vehicle.Boost:
<Tab name="Controls" displayKey="myModTabControls">
	<Category name="Vehicle" displayKey="myModCatVehicle">
		<Binding name="Boost" displayKey="myModBoost">
			<Description key="myModBoostDesc" />
		</Binding>
	</Category>
</Tab>
Assign the PlayerAction when the global settings have loaded:
public void OnGlobalSettingsLoaded(IModGlobalSettings modSettings)
{
    IControlBindingSetting boost = modSettings
        .GetTab("Controls")?.GetCategory("Vehicle")?
        .GetSetting<IControlBindingSetting>("Boost");

    if (boost != null)
    {
        // MyVehicleActions is your own InControl.PlayerActionSet, and Boost is a PlayerAction on it.
        boost.PlayerAction = MyVehicleActions.Instance.Boost;
    }
}
You can also tag a static field or property that holds the PlayerAction with
[SettingPlayerAction], and BindSettingsClass assigns it for you. See
Attach a PlayerAction to a Binding.
What every type shares
Whatever the type, a setting can carry:
- a
displayKey, the label on the left; - a
<Caption key=""/>and<Description key=""/>, shown in the pane when the player hovers over or selects the setting; - a
<Preview><Image path=""/></Preview>, an image for that pane; - on a global setting, a
<RestartScope scope=""/>ofReloadorRestart.
Every value setting, which means every type but Binding, keeps three values:
| Value | Meaning |
|---|---|
| default | what the setting resets to |
| applied | the value that is saved and that your mod acts on |
| selected | the value the player is looking at but has not saved yet |
Use Global Settings in C# explains how the three interact.
Choose Global or World Settings
What a global setting and a world setting each are, who changes them, where their values live, and how to pick the right kind for a setting you are about to declare.
Show Gears Support
Add the Supports Gears badge to your mod's pages, and describe your mod's use of Gears so players know whether they need to install it.